Category Archives: Garden Maintenance

How to Grow a Lush Lawn

This is the grass on the east side of my house. I haven’t watered it for about a month, but it stays green because it’s shaded by the house in the afternoon. I provide supplemental water to this area in the summer once or twice a month if it’s really hot. I water the back part of this stretch of lawn more frequently because it gets more sun exposure. There’s also root competition from my crabapple tree. In addition, bunnies have been munching on my grass frequently this summer. I have overseeded my lawn two or three times during the last seven years.

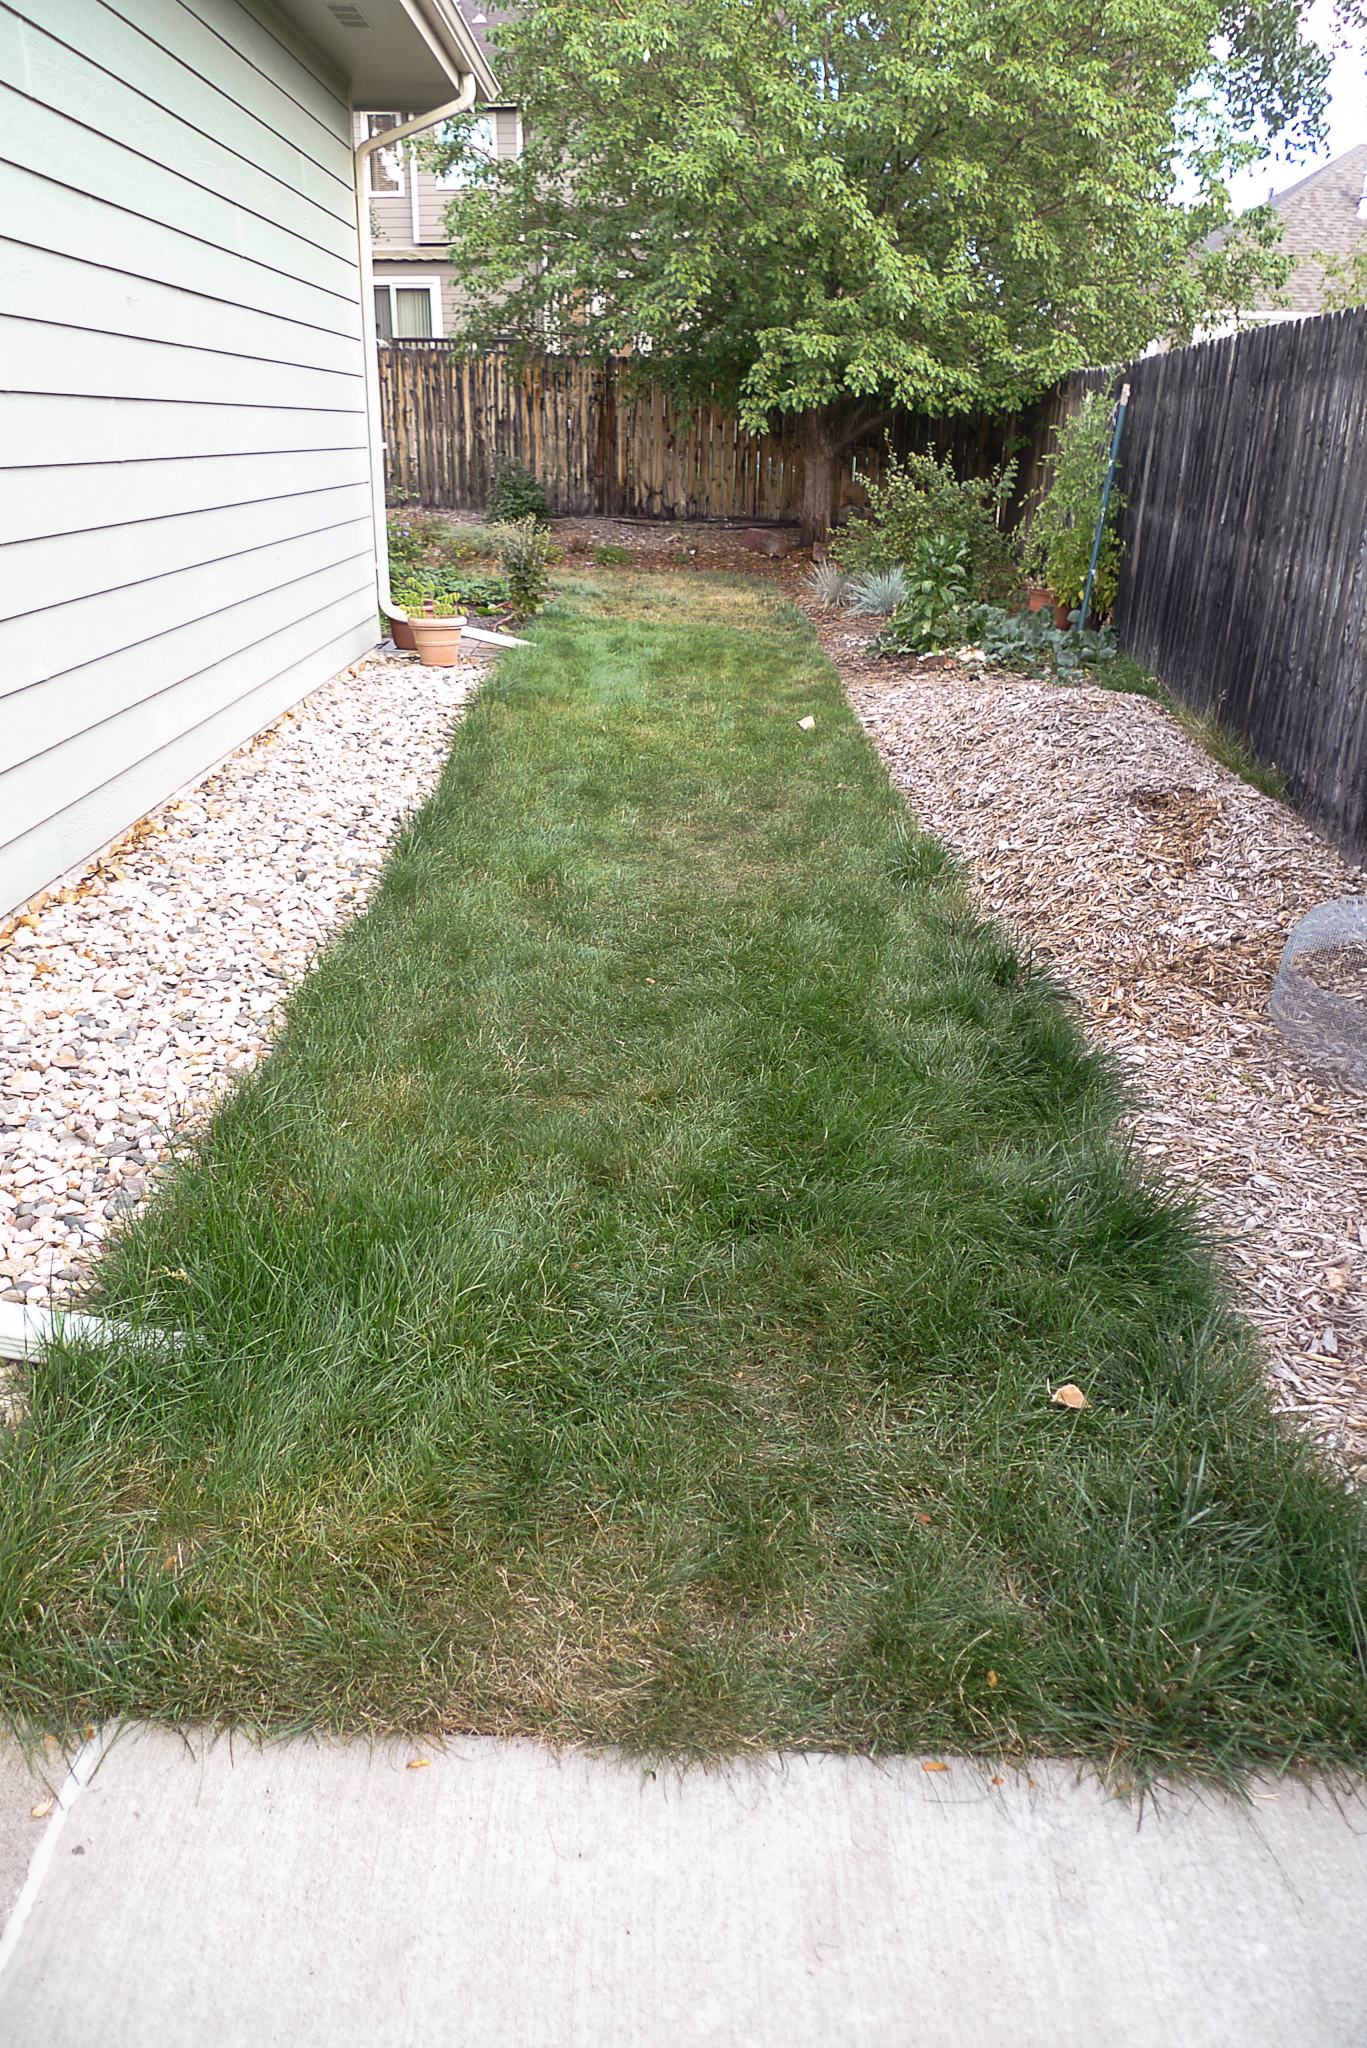
Want to thicken your lawn? Early September is an ideal time to do it in Colorado.

When planting seed, many homeowners rough up the soil a little, drop seed, cover the seed, and keep the area well-watered for about two weeks, giving the seeds time to germinate. In the meantime, no one can walk on the area and the seeds may be eaten by birds.

Want to know how professionals overseed football fields? I learned this method from Dr. Tony Koski, Colorado State University Turfgrass Science professor, when I went through master gardener training.

I’ve used this method many times since. It works. And you can even walk on the area while the grass is being established.

Here are the steps:

*Buy high-quality grass seed at a reputable nursery. It’ll have a higher germination rate and fewer weeds than the stuff you buy at the big box stores.

*Aerate your lawn in late August or early September.

*Using a seed spreader to distribute the seed over the ground. Then drag a metal rake with the tines facing skyward behind you around the yard, knocking the seeds into the aeration holes. (OK, professionals may use fancy equipment to do all this, but you can get the same results with a rake.)

*Top dress the lawn by sprinkling compost here and there and using a rake to spread it evenly. Then drag your rake again, tines up, behind you to knock some of the compost into the aeration holes, which act as germination chambers. These below-ground chambers protect the seeds from foot traffic.

*Water the seed about twice a day for two weeks. That’s how long it takes for many grass seeds to germinate. It’s crucial not to let the seed dry out because a dried seed is a dead seed. After germination, you can cut back on watering to maybe two times a week, depending on how high temperatures get and whether it rains in the meantime.

*When it comes time to mow, don’t go lower than three inches in height. Taller grass reduces the amount of sunlight reaching the ground and helps choke out weeks.

So there you have it—the secret to growing a lush lawn. Keep your yard watered, but don’t overdo it. Water infrequently and deeply to encourage deep root growth. I water about twice a week when temperatures are above 85 and there’s no rain. Otherwise, I water about once a week in the areas that receive the most sun.

Leave a comment

Filed under Garden Maintenance

Fort Collins Homeowner Loses 22 Trees

This is every homeowner’s nightmare: beautiful, mature trees quickly dying one by one.

Earlier this year, a homeowner in rural northwest Fort Collins lost 22 evergreen trees over two months.

“I first noticed a problem in early to mid-April,” the homeowner recalls. “The needles turned brown on one tree after another. It was like a cascading, domino effect.”

She noted that brown needles started showing up on the inside of the tree and began working their way outward.

“Each individual tree took three weeks to die, if that,” she adds. “I love trees and the many benefits of trees. I just couldn’t look at them.”

The homeowner called seven arborists. They said couldn’t make it over to her place for weeks or even months, but they offered the usual explanations—not enough water, too much heat, extreme winds. All these factors likely contributed to the trees’ decline. But that wasn’t the real problem, according to the eighth arborist, who took the trees down.

The eighth arborist raised the possibility of pine wilt disease. And he had a cancellation, so he could fit the homeowner into his schedule.

How did the arborist confirm the disease? He cut axial cross-sections (cookies) from the trees. He then showed the homeowner the damage he said was created by pinewood nematodes before he cut down and removed all 22 trees.

“I was devastated,” Soto notes. “It felt like a death. It was a death.”

The only problem is that the trees weren’t pines—they were spruces, according to Colorado State University forestry professor Dr. Seth Davis and professor emeritus Dr. Ned Tisserat, who viewed photos of the trees. Pine wilt nematode doesn’t attack spruces.

When I told Dr. Tisserat that the trees had been planted in holes that weren’t wide enough or deep enough, he said that if the trees were still getting established and were exposed to high winds, drought, and extreme heat, those factors together likely killed the trees. The homeowner said the trees had been in the ground just two years.

However, Dr. Tisserat didn’t rule out the possibility of chemical poisoning because he noticed in the photos that there weren’t weeds or other groundcover around the trees.

Note the raised root ball on this tree. The hole wasn’t dug wide enough or deep enough, which caused the tree to heave out of the ground over time.

We’ll never know for sure how the 22 trees died because the arborist didn’t send tree tissue to CSU’s plant diagnostic lab for analysis.

Mind you, this was a licensed arborist. But he wasn’t certified by the International Society of Arboriculture (ISA), according to my check of his credentials.

The point of all this is to warn you to know who you’re hiring. This poor homeowner got stung twice—first by the green industry “professionals” who planted her trees incorrectly and second by the arborist who apparently doesn’t know a pine tree from a spruce.  

I, too, got stung by a so-called professional several years ago when I first moved to Fort Collins and didn’t know anyone. So I followed a recommendation from a neighbor on nextdoor.com and ended up with a landscaper who didn’t know soil amending from mulching.

How do you find a competent green industry professional?

*Check to see if the service provider has certifications. For arborists, check the ISA website, which enables you to find certified arborists and to verify arborists’ credentials in your area, regardless of where you live in the world.

If the arborist isn’t certified, check to see if he/she has a degree or certificate in forestry or a related field.

For landscapers, determine whether the owner or employees hold a landscape management or related degree or certificate from a college or university. I can’t tell you how many times I’ve had to explain to homeowners that the reason their plants are dying is because the landscaping company installed full-sun plants in full shade.

For landscape designers, determine whether they hold a landscape design degree or certificate from a college or university.

*Ask a local, reputable nursery for recommendations. Some nurseries keep a list of screened green industry professionals to help their customers select qualified suppliers.

*Check with your local forestry department to find out if a particular arborist is licensed. A licensed arborist isn’t necessarily ISA-certified, but at least you’ll know whether they’re operating legally in your locality.

If you live in Colorado, be aware that you’ll likely have to wait weeks or months to have a green industry professional work on your property. That’s just the way it is here. Avoid using an unqualified “professional” who happens to be available.

Leave a comment

Filed under Garden Maintenance

What to Do with All Those Pine Cones

These four plucky gnomes reduced the stray pine cone population in Larimer County, Colorado, while providing holiday whimsy. My friend’s gnome is on the far left; mine is on the far right. If I had a day job, I wouldn’t quit it to pursue a career in gnome-making.

Are you one of those gardeners who has a pine tree with a gazillion cones? Although those cones are beautiful, they can make a mess and even pose a fire hazard.

So what can you do with them?

The Garbage Garage at the Larimer County, Colorado, Landfill has an answer: Make pine cone gnomes.

Yesterday a friend and I attended a Garbage Garage class facilitated by Cindy Tunney, Larimer County education assistant. Cindy even provided five-inch pine cones from her own yard. We industrious crafters created our gnomes in about an hour.

If you would like to make your own gnome, here’s some information:

What you’ll need. A pine cone; felt for the hat and feet; beads or pom-poms for the nose; pom-poms or other trim for decorating the hat; one 12-inch pipe cleaner for bending the hat; a lid from a frozen juice can for the base; yarn for the beard; cardboard for hat and feet patterns and for winding the beard yarn; scissors; measuring tape; and a glue gun.

Making the hat. The hat is the most complicated part of the project. All 4 One Home provides one of the better hat-making descriptions I’ve seen, but you’ll need to adjust the size of the hat, depending on the circumference of your pine cone. After you’ve made a pattern and cut your hat triangle out of felt, glue the 12-inch pipe cleaner vertically on the inside of the hat triangle before gluing the hat together. The pipe cleaner should start at the pointy end of the hat and run to the bottom. Any extra length can be wrapped around the pine cone at the hat’s base to secure the hat to the pine cone. The pipe cleaner will enable you to bend the hat a funky angles. If you want, you can add a contrasting strip of felt around the base of the hat, a pom-pom at the point, and other baubles for decoration.

Making the beard. After you position the hat on the pine cone, cut a piece of cardboard about six inches wide and as tall as the space between the base of the hat and the bottom of the pine cone. If you have a five-inch pine cone, for example, the distance from the base of the hat to the bottom of the cone will likely be 3.5 to 4 inches. Holding the cardboard so the six-inch side is parallel to the ground, wrap the yarn vertically around the cardboard 20 to 25 times, depending on the thickness of the yarn. Cut the end of the yarn. Then cut a separate piece that’s twice as long as the short side of the cardboard. Insert that piece under the looped yarn at the top edge of the cardboard and tie the yarn together. If possible, the inserted piece should hang evenly from each side of your knot so that the ends can be incorporated into the rest of the beard. Now insert your scissors along the bottom edge of the cardboard and cut through the loops. You should have some semblance of a beard, which you can trim later. Using your glue gun, fasten the beard to the pine cone at the base of the hat.

Making the nose and feet. Glue a pom-pom or bead at the base of the hat and over the center of the beard to make the nose. For the feet, cut a heart-shaped piece of felt. Glue the heart to the juice can lid so the humpy end of the heart extends over the edge of the lid. Then glue the feet and lid to the bottom of the pine cone.

Adding finishing touches. Trim the beard so you can see the gnome’s feet. Fluff it appropriately. Glue on other enhancements as you see fit.

If gnomes aren’t your thing, Craftaholics Anonymous offers 25 other pine cone crafts that you can tackle.

What if you don’t have a pine tree, but want to make gnomes and other treasures? Check around your neighborhood. If you find a pine tree, be sure to ask the owner’s permission before harvesting any cones.

If you live in Fort Collins, Colorado, don’t take cones from the city’s parks and other properties. It’s illegal. If you live in other municipalities, contact the city or county before foraging on their land.

As a last resort, you can buy pine cones on Craigslist and Facebook Marketplace, as well as at craft stores and other retail outlets.

Thank you for reading my blog over the years. I wish you the happiest of holidays. I’ll write to you again in March 2022.

Leave a comment

Filed under Garden Maintenance, Whimsy

It’s Payback Time for Trees in Winter

In the summer, trees provide shade from blazing sunlight and help lower our air conditioner bills.  On top of that, these impressive plants absorb pollutants, such as carbon dioxide, from the air and emit oxygen so we can breathe more easily.

So in the winter, it’s payback time for trees. We need to look out for them the way they look out for us.

How? There are several ways:

Wrap trees to prevent sunscald and discourage frost cracking.  Protect your young, thin-barked trees by wrapping them in the fall, preferably around Halloween.  If you’re like me, you may not get around to it till November.  It’s still not too late to do it now before snow starts, causing reflection of sunlight off of snow and onto trees.  But get it done.  Then be sure to take the tree wrap off around Easter so insects don’t burrow under it and start munching or building nests.  CSU offers tree-wrapping tips.

This is what happens if you don’t wrap thin-barked trees when they’re young. Notice the vertical crack in the middle of this spring snow crab. The trunk has grown around the crack to seal it, but the tree is permanently disfigured.

Water trees once a month. Do this only when temperatures are above 40 degrees, and do it during mid-day so water has time to soak into the ground before freezing at night.  But don’t water where there’s snow on the ground.

Place a hose at the drip line (under the widest part of the tree canopy, where rain would drip from the branches to the ground) and let water trickle into the ground.  Move the hose periodically until you’ve gone all the way around the tree.  Evergreens, in particular, need winter watering because they lose water through their needles in dry air.

Notice the location of the green watering hose. It’s about three feet from the base of this little Tina dwarf crabapple tree because that’s where the drip line is. Also, notice the tree wrap around the trunk. As needed, keep trees wrapped and watered during the winter.

Prune trees when necessary, usually during dormant season.  Have you ever noticed all the broken branches after a major snowstorm?  Breakage usually results from poor tree maintenance.  That’s one reason it’s important to keep your trees pruned.

Winter is the best time to prune most trees, especially species that are susceptible to fire blight. I’m talking about apples, crabapples, pears, serviceberries and hawthorns, among others.

Also, after the leaves fall, you can assess a tree’s structure and problem areas more accurately before pruning.

Take good care of your trees in winter, and they’ll stick around to take care of you the rest of the year.

Leave a comment

Filed under Garden Maintenance

Hippity Hoppity, Damage is on its Way

Getting rid of weeds is one natural way to help reduce the number of grasshoppers in your garden. (Photo courtesy of Whitney Cranshaw, Colorado State University, Bugwood.org)

Lately when you’ve walked through your garden, have you noticed swarms of grasshoppers bouncing out of your way? They’re not just annoying; they also cause serious damage by chewing holes in the leaves, stems and fruit of your plants.

What can you do to control these critters? You can always go the chemical route, using baits, dusts and spray insecticides. But there can be complications, such as the expense, need for reapplication, killing of beneficial insects, and chemical sensitivity issues for gardeners with allergies. Also, grasshoppers move around a lot, making it difficult to reach them.

So what are other options for dealing with grasshoppers?  Here are five suggestions.

  • Invite natural predators. One reason I cultivate a pollinator/wildlife-friendly garden is because birds and other creatures like to feast on pests, including grasshoppers. Provide native trees and shrubs where animals can hang out and raise their families. Avoid using pesticides, which can harm beneficial insects in addition to harmful ones.
  • Get rid of weeds. Weeds provide food for newly hatched babies, as well as egg-laying adults. 
  • Till your soil. Till in the early spring, summer and late fall to destroy grasshopper eggs buried in the ground.
  • Raise chickens.  Chickens, ducks and geese love to feast on grasshoppers, so if you’ve been thinking about establishing a chicken coop or other shelter, think about these birds’ pest-control capabilities.
  • Dust your plants with flour.  When grasshoppers ingest flour, it interferes with their digestive systems.  Of course, you have to reapply the flour after irrigation or after a rain.  But if you used an insecticidal dust, you would have to do the same thing anyway.

If you don’t have the time or inclination to deal with grasshoppers, you can always just wait for them to die off when the weather gets cold.  You can also let your cats treat them as playthings, pouncing on them periodically.

Leave a comment

Filed under Garden Maintenance

It’s Time to Get Cagey in the Garden

This easy-to-make cage protects a small Pawnee Buttes sand cherry from attack by marauding rabbits.

As weather turns wintry in Colorado, it’s prime time for installing cages over young shrubs to protect them from critters.

In my yard, critters are mostly rabbits and squirrels.  In your yard, critters might include deer, as well.

I’ve noticed that rabbits particularly savor new growth on my young Pawnee Buttes sand cherries.  So I protect these shrublets during their first two to three years with cages from early winter to late spring.

Sand cherries aren’t the only victims when it comes to nibbling.  Other young shrubs reportedly favored by wildlife include:

  • Barberry
  • Burning bush
  • Forsythia
  • Hawthorn
  • Koreanspice viburnum
  • Lilac
  • Serviceberry
  • Smokebush
  • Eastern redbud

Fortunately, some of these shrubs become less attractive to wildlife as they mature.

All you need for making and installing a garden cage is 1/4″ hardware cloth, tin snips, wire, 3 landscape pins, and gloves. If you can’t push the landscape pins into the soil, you may need a mallet or hammer, as well.

Personally, I’ve never had a problem with rabbits attacking my young serviceberries or smokebush.  But I’ve seen squirrels decimate my young burning bushes.  Hence the need for cages.

Cages are easy to make.  First, decide the size of cage you need.  Mine are 16” in diameter and 18” high.  Then buy a roll of ¼” hardware cloth and use tin snips to cut the cloth to the size you need for the walls of the cage.  Curl the cut piece into a circle and secure the ends with lightweight wire.  You now have a circular base.  Then cut another piece of hardware cloth for the ceiling.  If you want to get fancy, you can cut the ceiling in a circle to match the top edge of the base.  As for me, I simply cut a square large enough to cover the base.  Then wire the ceiling to the to the base.  To secure the cage to the ground, I thread three strategically placed landscape pins through the landscape cloth at the base of the cage and then push or pound the pins into the ground.

When you remove the cages in the spring, you can either store them as they are or unwire them to store them flat.


Leave a comment

Filed under Garden Maintenance

Water Restrictions are Coming: 10 Steps You Can Take Now

This time of year, prairie winecups produce hundreds of seeds. Harvest and scatter them now if you want more of these drought-tolerant beauties in your yard next spring.

On October 1, 2020, water restrictions will go into effect for customers of the  City of Fort Collins Water District.  This means residents won’t be allowed to water their lawns, wash their cars, spray their sidewalks and patios, or use water features, misting devices, and water toys.  Residents can, however, water trees, food crops and non-lawn parts of their landscapes by hand or drip systems.

City officials are concerned about a potential water shortage because of our drought conditions, the 6-weeks-and-counting Cameron Peak fire, and a Horsetooth Reservoir maintenance project.

So it’s more important than ever to conserve water.

Of course, you can set up drip systems and rainwater-harvesting devices.  But what are some actions you can easily take right here, right now to save water?

  1. Plant native and/or drought-tolerant grasses, ground covers, shrubs and trees. Once established, your plants won’t need as much watering. Group plants together based on similar water needs.  Right now, many drought-tolerant plants are producing seed.  Harvest that seed and spread it so baby plants will emerge next spring.
  2. Avoid throwing fruit and vegetable scraps down your garbage disposal.  Put them in the garbage or, better yet, a compost pile.
  3. Place mulch around trees and plants 2-3 inches deep to retain moisture in the soil.
  4. Raise your mower blade as high as it will go. Higher mowing enables grass to conserve moisture and encourages grass roots to grow deeper.

    Use a water-filled jug or bottle to displace water that would otherwise be used to fill the toilet tank each time you flush.

  5. Indoors, take short showers instead of baths.
  6. In bathrooms, stick a water-filled plastic jug or bottle in your toilet tank to reduce the amount of water needed to fill the tank after each flush.
  7. Keep a bucket in your shower stall to catch stray water for watering outdoor plants.
  8. Don’t let water run while brushing your teeth or washing your face.
  9. When hand-washing dishes, use two large containers—one with soapy water for washing and one with clear water for rinsing.
  10. Clean fruits and veggies in a water-filled bowl instead of running tap water.

These easy steps are just a few ways you can contribute to Fort Collins’ efforts to avoid a water shortage.  For more information about the city’s water use restrictions, visit Fort Collins’ utilities website.


1 Comment

Filed under Garden Maintenance

Layering: The Key to a Professional-Looking Landscape

One reason this landscape bed is so appealing is the effective use of layering. Notice the tall spruce and ornamental tree used as top layers. Then below, plants progress downward from tall/medium shrubs to tall perennials, and finally, to ground covers.

One characteristic that visitors often notice in a well-designed landscape is plants of varying heights.

Juxtaposing plants of different sizes is called layering.  This practice generally involves using trees and tall shrubs as backdrops for smaller shrubs, perennials, grasses and bulbs.  With experimentation, you can create layers in your own garden.  It just takes some planning.  And when plants don’t always grow as tall or short as expected, you have to do some plant shuffling.  But fortunately, most plants are portable and relatively easy to move.

When designing a landscape, I think in terms of five layers:

Shade trees and large evergreens.  These landscape giants grow about 30 to more than 50 feet high. Examples are honeylocusts, oaks, maples, Kentucky coffee tree, and American elm.

Ornamental trees and small evergreens. Plants in this category grow about eight to 25 feet high. Some of my favorites are autumn brilliance serviceberry, Tina dwarf crabapple, spring snow crab, Russian hawthorn, and golden raintree.  As for small evergreens, I take their “mature height” on nursery tags with a grain of salt because most of them grow huge.  However, the dwarf Alberta spruce grows very slowly and stays relatively small.

Medium/large shrubs and grasses. Here, I’m talking about shrubs and grasses that grow six feet or taller.  Think of viburnums, rose of Sharon, chokeberries, serviceberries, Peking cotoneaster, redtwig dogwoods, tiger eye sumac, Cheyenne mock orange, bluestem joint fir, mugo pine, and Swiss stone pine, for example.  Tall grasses include big bluestem, giant sacaton, and Miscanthus sinensis ‘Gracillimus.’  Don’t forget about vines, as well, to add height to your garden.

Tulips and alliums pair well with blue avena grass, adding a layer by poking up above the grasses. Here, coral tulips contrast beautifully with spiky blue grass in terms of color, texture, and form.

Small shrubs and grasses, tall perennials, and tall bulbs. Small shrubs and grasses can range anywhere from about two to five feet tall.  One of my favorite plants in this category is blue avena grass, which grows about 2.5 feet high and wide.  First of all, it isn’t as allergenic as most grasses.  Second, it’s a four-season plant.  Third, it’s blue, which is sometimes a difficult color to find in plants for the garden.  And fourth, it looks fantastic with reds, purples, and oranges.  Pair it with coral tulips in early spring and purple alliums in late spring/early summer.

Some easy-to-grow small shrubs are emerald mound honeysuckle, Pawnee Buttes sand cherry, meidiland ground cover roses, shrub roses, color guard yucca, Carol Mackie daphne, Genista lydia bangle, gro-low sumac, spirea, weigela, and leadplant, to name a few.  The sand cherries, meidilands, and gro-low sumac make outstanding taller groundcovers, especially when you underplant them with shorter groundcovers.

Notice the height progression from the Genista lydia (green in foreground) to the red-leaved Pawnee Buttes sand cherry and on up to the fading tan sunset hyssop. Then in the upper right-hand corner, there’s a taller serviceberry.

Tall (as in two to five feet) perennials that dress up your garden include Joe Pye weed, hyssop, coneflower, shorter varieties of hardy hibiscus, daisies, asters, lavender, crocosmia, black-eyed Susan, oriental poppies, Rozanne cranesbill, bloody cranesbill, red hot poker, and tall garden phlox.

Bulbs that add height in the lower region of the garden are iris, daylilies, alliums, tulips, daffodils, frittilaria, Asiatic lilies, and dahlias.

Ground covers. This category of low-growing (one to two foot), spreading plants often gets short shrift in the garden, even though they provide continuity and help prevent weeds.  You wouldn’t build a house without flooring, so why wouldn’t you want an underpinning for your garden?

I use Veronica pectinata as a fluffy blue carpet from which bulbs can emerge each spring.  Other delightful choices include prairie winecups, orange carpet hummingbird, creeping phlox, Siberian bellflower, Angelina and other sedums, soapwort, candytuft, dead nettle, and creeping thyme.

If you haven’t thought about ways to layer plants in your garden, I encourage you to do so.  You may find the results rewarding.


Leave a comment

Filed under Garden Maintenance, Landscape Design, Plant Geekiness

Is it Time to Fine-tune your Landscape?

Angelina sedum (yellow in foreground) and purple sensations allium add pops of color to the spring landscape. Notice tulip foliage that emerged from blue Veronica pectinata ground cover, which provides a carpet for spring bulbs.

In Colorado, it typically takes a good three years for a new landscape to take off.  At that point, you may notice aspects of the garden that need addressing.  Examples include coloration and bloom times, as well as hardiness, sunlight, and maintenance concerns.

Coloration.  How’s the color balance in your garden, especially in the spring, when plants often don’t bloom as long as they do later in the season?  In early- to mid-spring, for instance, I noticed that my front yard was heavy with purples, blues, and whites, thanks to little Trudy catmint (purple), blue avena grass, Veronica pectinata (blue), Pawnee Buttes sand cherry, and serviceberries (whites).  I realized that I needed to add some pops of brighter colors, such as yellows and reds.  So I planted Angelina sedum (yellow) in a few strategic spots.  I also planted fuchsia and coral tulip bulbs.  Just a few vivid plants make the garden more exciting.

Bloom Times.  Bulbs are great fillers in early and mid-spring, when other plants are just beginning to wake up.  Fortunately, Colorado has an ideal climate for most bulbs.  Add some Corydalis solida, daffodils, dwarf iris, tulips or allium, to name just a few.  I’ve discovered that purple sensations alliums, which bloom during the second and third weeks of May in Fort Collins, deliver tall lollipops of violet-purple after most tulips have faded.  Pair your bulbs with low-growing evergreen groundcovers, such as Veronica pectinata or white candytuft (Iberis sempervirens), so blooms will have a lush, colorful carpet from which to emerge.

Sunlight Issues.  You may discover that some of your plants need more sun or shade than you originally thought.  Spring is a great time for plant shuffling.  After four years in my home, I decided to move my autumn brilliance serviceberry tree because: (1) It would likely grow faster if it weren’t so shaded by the next-door neighbor’s large honey locust tree; and (2) I needed more shade in front of a southeast-facing bedroom window.  So I uprooted my serviceberry (a much easier job than I expected) and moved it in front of the bedroom window.  Then I planted a compact merlot redbud tree in the area where the serviceberry originally stood.  The redbud will likely appreciate more shade than the serviceberry did.

Hardiness Issues.  You’ve been so conscientious, reading the plant descriptions before buying and installing your plants.  Heck, some of them are even Plant Select winners, so they’re sure to work well in your garden, right?  Well, not always.

For example, Coral Canyon twinspur performed like a champ for two seasons, then up and died.  I had planted it before when I lived in Denver, and it lived only one season.  So I’m done with twinspur.

Mojave sage (Salvia pachyphylla), another highly touted plant, has gorgeous silver-blue foliage.  I planted three.  Each year for three years, I replaced one to two plants because they just couldn’t deal with our cold winters.  Now, three splendid blue avena grasses reside where Mojave sage did so poorly.

If plants keep dying on you, either move them to new locations or simply replace them with something else.  Don’t be like me.  I clung to Mojave sage longer than I should have.

Maintenance Issues.  You may find that some plants require more maintenance than you’re willing to give them.  Blanket flower and coreopsis are two prime examples.  They’re lovely flowers, but you have to deadhead them every 15 minutes.  What’s worse is that the blanket flower seed heads are pointy, so you have to wear gloves to avoid getting poked.

Some gardeners won’t grow roses because they don’t want to prune and deadhead them.  I understand.  However, roses vary in their neediness for care.  For example, purple rain roses die back like crazy and require a lot of pesky pruning in the spring.  Red Meidiland roses, on the other hand, don’t die back nearly as much, so pruning isn’t as labor intensive.

While there’s still time to plant, consider fine-tuning your landscape by moving plants around or installing new ones.  What till fall, however, to plant spring-blooming bulbs.

Leave a comment

Filed under Garden Maintenance, Landscape Design, Whimsy

How’s Your Pruning Technique?

Cut ornamental grasses back as new growth emerges. Otherwise, you’ll end up with new growth poking out of dead blades, the wrath-of-God look.

As new growth emerges, our fingers often itch to get out in the garden.  Late February/early March is an ideal time to start cutting back ornamental grasses. With perennials, early to mid-March is a good time to prune.

Trimming ornamental grasses is simple, unless you have a huge stand of pampas grass or some such.  For small grasses, such as blue avena, simply use pruners or small hedge clippers to cut the blades down to 4-6 inches above ground.  For larger grasses, wrap a bungee cord or rope around the plant to contain the blades like a pony tail, then use manual or powered hedge clippers or a chain saw below the pony tail to cut the grass back to 6 inches or lower.  Once done, you can simply carry the rubble to your compost pile and remove the bungee cord or rope.  Be sure to wear gloves to avoid cuts.

Make quick work of pruning agastache and other spiky plants by wrapping a bungee cord around the base, then cutting the stalks below the cord.

As for perennials, you can prune them different ways, depending on the individual variety.  For some plants, such as soapwort, it’s often easiest to simply grab a handful of foliage, twist it, and yank it out.  Before you do this forcefully, however, give the plant a gentle tug to make sure you won’t be ripping it out of the ground when pulling on it.  But if you end up ripping out a small, rooted chunk of the plant, you may be able to transplant it elsewhere.

With orange carpet hummingbird and other short plants with stiff dormant twigs, you can often grab a handful of twigs and snap them off.

For taller, stalky perennials such as agastache, you may find it easiest to treat them like a large ornamental grass, wrapping a bungee cord around the stalks before cutting below with hedge clippers.

Otherwise, you can simply cut perennials to the ground with pruners, although it sometimes takes longer than some of the methods mentioned above.

You can prune many shrubs and trees this time of year, as well, using techniques from Colorado State University Extension.

Leave your roses alone, though.  Don’t prune them until late April or early May.  Otherwise, frost might kill new growth that occurs when pruning stimulates roses’ hormones.  For more information on roses, check CSU Extension’s Pruning Roses.

Leave a comment

Filed under Garden Maintenance